> ## Documentation Index
> Fetch the complete documentation index at: https://comfyart.org/llms.txt
> Use this file to discover all available pages before exploring further.
# 快速开始
> 安装 ComfyArt,打开画布,生成第一张图。
## 准备
* 一套能正常运行的 [ComfyUI](https://github.com/comfyanonymous/ComfyUI),显卡要能跑你选的图像模型。
* 你要用的功能对应的模型文件,见[模型](/zh/guides/models)。只装 Qwen Image 2.1 就能用生成、快速编辑、编辑文字和扩图。
## 安装
```bash theme={null}
cd ComfyUI/custom_nodes
git clone https://github.com/jtydhr88/ComfyArt
```
用运行 ComfyUI 的同一个 Python 环境。目前只多一个 `pypdfium2`,用于上传 PDF。
```bash theme={null}
pip install -r ComfyArt/requirements.txt
```
在浏览器里打开 [http://127.0.0.1:8188/comfyart/](http://127.0.0.1:8188/comfyart/)。
构建好的页面已经放在 `dist/` 里,使用 ComfyArt 不需要装 Node.js。只有修改了 `src/` 里的前端源码时,才需要用 `npm install && npm run build` 重新构建。
## 生成第一张图
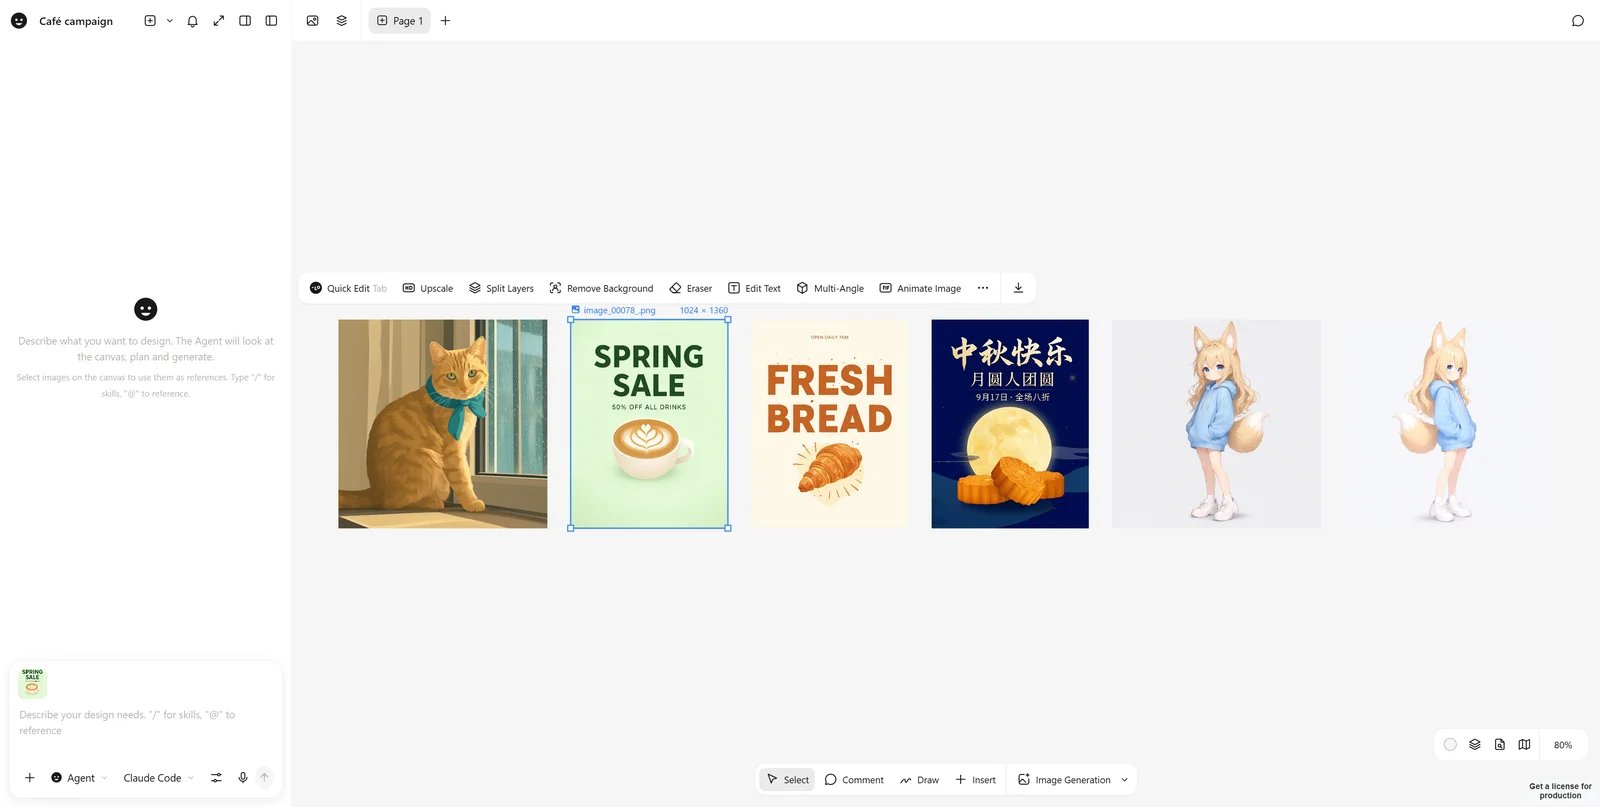 1. 点底部栏的 **图像生成**,画布上会出现一个生成卡片,下面是提示词框。
2. 描述你想要的图。图里要出现的文字用引号括起来,例如 `标题 "夏日饮品"`。
3. 选好比例、尺寸和张数,点箭头按钮。ComfyUI 生成时,卡片外圈会有进度环。
4. 选中生成结果,就会出现图片工具栏:快捷编辑、放大、图层拆分、去背景、橡皮、编辑文字、多角度、动态图片,**⋯** 里还有更多。
## 项目和语言
* 每个项目对应一个网址:`/comfyart/?project=`。左上角的 **项目** 按钮可以切换、重命名和新建项目。
* 项目保存在 ComfyUI 用户目录的 `comfyart/projects/` 下,并有快照历史可以恢复。
* 界面语言跟随 ComfyUI 的语言设置(中文或英文)。
## 下一步
参考图、配色、底图和视频。
打开 Agent,让它帮你规划并完成设计。
This documentation is built and hosted on [Mintlify](https://mintlify.com), a developer documentation platform.
1. 点底部栏的 **图像生成**,画布上会出现一个生成卡片,下面是提示词框。
2. 描述你想要的图。图里要出现的文字用引号括起来,例如 `标题 "夏日饮品"`。
3. 选好比例、尺寸和张数,点箭头按钮。ComfyUI 生成时,卡片外圈会有进度环。
4. 选中生成结果,就会出现图片工具栏:快捷编辑、放大、图层拆分、去背景、橡皮、编辑文字、多角度、动态图片,**⋯** 里还有更多。
## 项目和语言
* 每个项目对应一个网址:`/comfyart/?project=`。左上角的 **项目** 按钮可以切换、重命名和新建项目。
* 项目保存在 ComfyUI 用户目录的 `comfyart/projects/` 下,并有快照历史可以恢复。
* 界面语言跟随 ComfyUI 的语言设置(中文或英文)。
## 下一步
参考图、配色、底图和视频。
打开 Agent,让它帮你规划并完成设计。
This documentation is built and hosted on [Mintlify](https://mintlify.com), a developer documentation platform.